Kitchen Science Experiments: Fun with Water!

Found everywhere from the bathtub to puddles, water is the perfect laboratory for young scientists. Splishing and splashing is more than just fun!
Children can easily explore water in meaningful ways during everyday tasks.
Don’t cry over spilled milk--use it as a science lesson! You can explore how different materials absorb water when you’re cleaning up from dinner or drying off after a bath. Switch up the drinking glasses or cups for each meal and explore how the same amount of liquid fills different containers. Stomp on the floor near the dog’s water dish and watch the surface of the water to see how it changes.
Water shows us that states of matter really do matter!
There aren’t many substances young scientists can easily study in three different states of matter as water. Water behaves differently when it is ice or steam and melting and freezing are great scientific processes to explore. Encourage your scientist to observe water in all its forms: watch raindrops rolling down the window or snowflakes blowing in the wind; or feel the condensation on the outside of a cold glass of milk and warm your hands in the steam of their hot chocolate. Drink your favorite beverage, then freeze it and eat it as a popsicle.
Water is a great way to introduce young children to conservation.
Some of the easiest conservation tasks for children involve water. Making sure your tiny environmentalist doesn’t leave the water running while they brush their teeth or keeping track of how long their showers or baths are is a great way to start thinking about not wasting water. Other actionable things children can do, such as using reusable water bottles or using fewer plastic straws, impact water animals like sea turtles!
Here are some water experiments you can conduct with your young scientists at home in your kitchen or outside!
Water Drop Art
Supplies needed:
Food Coloring
Water
Eye Dropper or medicine dropper (you can also just drip water with a fork or spoon)
Wax Paper
Small bowls
Paper (try construction paper, copy paper, cardstock, paper towels)
Instructions:
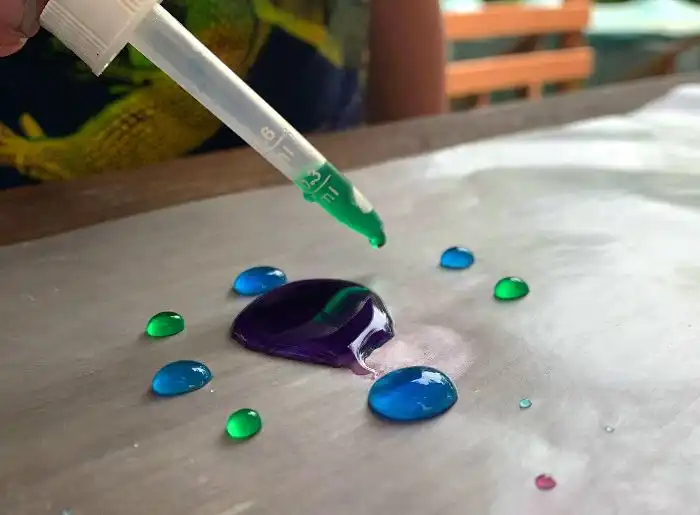
- Add food coloring to water to create your own custom colors for your art work. Use more water to make lighter colors and less water to make more vibrant colors. Make as many or as few colors as you want. Mix colors and have fun!
Exploration Questions: What happens when you add the food coloring to the water? What happens if you add the water to the food coloring instead? Do you have to stir them to mix or will they mix on their own? What colors do you get if you add more water or less water? What’s your favorite of the colors we’ve made?
- Spread a piece of wax paper out on the table. Using the dropper or spoon add drops of your colored water to the wax paper. Make predictions about and experiment with:
Making bigger drops and smaller drops
Placing drops very close together
Blowing on the drops of water
Moving the drops of water using the spoon or dropper
Tapping the drops with your fingers
- Gather different types of paper. Try to find different thicknesses of paper. Use circulars from the mail, paper towels, coffee filters, construction paper, post-its, copy paper, or even an old t-shirt. Lay the paper across the wax paper and water droplets, Pick the paper back up to reveal your artwork! Add more drops to the wax paper and start again.
Exploration Questions: Which paper was the most colorful? Which sucked up the most water? Which paper had the most mixed colors?
Why did that happen? First, the waxy coating on the paper is hydrophobic (“water hating”) which basically means that it stops the paper from absorbing the water like an uncoated piece of paper would. Because of this coating, the water molecules are more attracted to themselves than they are to wax paper so rather than spreading out along its surface, they stick together in droplets. Surface tension at the outside edge of the droplet keeps the drops nice and round-looking!
Ice Melt Challenge
Supplies needed:
Ice cube tray or small cups that can be frozen
Small toys, erasers, marbles, pom poms. Anything small enough to fit in your ice cube tray or cup (and won’t be ruined by being frozen in water!)
Water
Salt
Small bowls
Eye dropper, medicine dropper, or spoon
Toothpick, popsicle stick or fork
Winter gloves or a thick towel
Instructions:
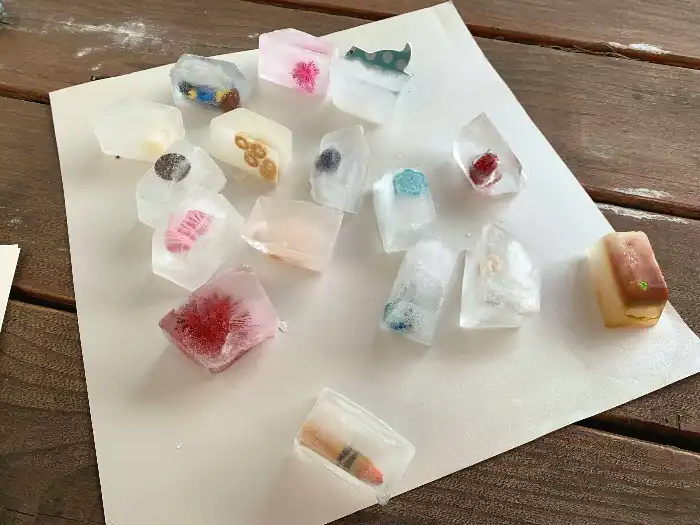
- Freeze small toys, food, or art supplies in ice cubes.
Tips:
- Only use objects that will not be ruined by water or freezing or objects that you don’t mind throwing away when you’re done - like a pom pom or pretzel.
- Choose some objects that are hard and nonporous (don’t absorb water) and some objects that are soft and porous (absorb water)
Exploration Questions: What do you think will happen when we put these objects in water? Which objects sink the bottom of the tray and which float at the top? Will they all freeze at the same rate? Which do you think will freeze solid first?
- After your ice cubes are frozen, explore different ways of freeing your objects from the ice. For older students, time each exploration and take pictures of the cubes at different stages of melting
Tips:
- Try adding warm water, salt water and regular water to your frozen cubes. Try adding the water by dropper, spoon and by dropping the whole cube into a glass of water. Which worked better? Which was faster?
- Try using a toothpick, popsicle stick, or fork to chip away at the ice. Did that work well?
- Try to warm up the cubes using your breath, put the ice cube in a sunny spot, or hold the cube in your bare hands, gloved hands or in a towel. Which method melted the cube the fastest?
Exploration Questions: If you needed to melt something very fast, what method would you use? Did any of these methods work better to unfreeze soft things or hard things?
-----
As you can see, exploring water as a science experiment at home can be fun and educational.
Share your water science experiment photos or videos with us on social media, tag us on Facebook or Instagram.
If your students love water experiments, they will enjoy these books about water:
- Water Can Be by Laura Perdie Salas
- Hey, Water! by Antoinette Portis
- All the Water in the World by George Ella Lyon and Katherine Tillotson
- Water by Frank Asch
- Flotsam by David Wiesner
Want to learn even more Kitchen Science Water Experiments? Check out this video demonstration on our YouTube channel:
Check out the kitchen science experiment blog articles about Fun with Bubbles, Fun with Color Mixing, and Fun with Light and Shadows.
What kitchen science experiments do you like best?
 Hollie is certified K-8 teacher who has been educating in the informal education field since 2005. She has developed and implemented countless exciting STEAM programs for families, classrooms, and teachers focused on the natural world, the scientific process, and ancient life. Her professional passions are inquiry, whole family learning, experiential learning starting in early childhood, and the intersection of literacy and science instruction.
She has recently developed a community-based program that encourages families to use dramatic play to learn science, increase literacy skills, and have fun together for which she received the Drexel University Presidential Award for Civic Engagement. She is most proud of her work on a popular science storytelling program for preschool families and classrooms that combines a book club format with engaging programs, innovative curriculum, and a hysterical puppet storyteller.